Categories
Food

Sarciadong Galunggong Recipe

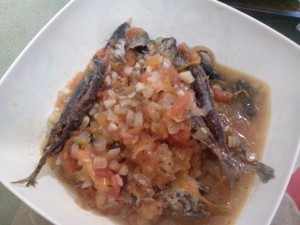
CameraZOOM-20130528123603458Early this morning, as we were thinking what to cook for brunch, we remembered that we have still have galunggong in the freezer. Our original plan is to have it just fried and crispy, then my husband wanted to have it as sarciado. Thanks to Mama Mel’s sarciado recipe, I texted her to get the recipe. 😀 Just added some ingredients.

It’s my first time to eat and cook Sarciadong Galunggong. I didn’t expect that this simple dish can be yummy and tasty. Because of my joy with this dish, I want to share it also! 😀

Ingredients:

  • 1/2 kilo Galunggong (preferably smaller size) 6pcs. Tomato (sliced thinly)
  • 1pc. Whole Garlic (minced)
  • 2pcs. Medium size Onion (minced)
  • Salt
  • Pepper
  • Sugar
  • Water
  • Oil
  • 1/2 tsp. Magic Sarap seasoning

Procedure:

  1. Put salt and rub on the fish then wash it. This is to remove/minimize the smell and taste of being fishy
  2. After washing thoroughly, put ample salt for frying.
  3. Deep fry the fish until crispy. Then let the oil drip before setting it aside.
  4. On a sauce pan, heat the pan and put a little oil. Saute the garlic until golden brown but not too much. Then add the onions, until caramelize.
  5. Add the tomatoes, a dash of salt and pepper. Put on cover and let it boil.
  6. When the tomatoes are soften, add half cup water. Cover and let it boil.
  7. When it boils, smash the tomatoes then add sugar (depending on your taste) and Magic Sarap. Let the liquid thicken. Add sugar and salt as needed. Make sure that the taste is more on sweet and somehow sweeter than your preferred because you will put the fish still.
  8. When you are done with the sauce, put in the fried fish. Stir it slowly with the sauce until covered. Let it boil one time then remove it from the pan to avoid over cooking.
  9. Remove the fish first and arranged it in parallel to one another in a large plate then pour the sauce over the fish. Plate it properly for a more presentable look. You can also add greens on top or at the side for added color.

Enjoy the dish! Give me a feedback on how you think of this dish or if you made any additional to make it better 😀
Categories
Food

Baked Chicken Honey Teriyaki Recipe

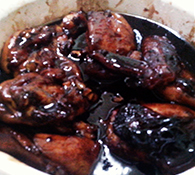
baked-chicken-honey-teriyakiAfter coming from a whole day of meetings and agendas, I have decided to cook Chicken Teriyaki for dinner. Actually, this is my first time to cook and bake a teriyaki dish. So what I did was, I researched first for existing recipes online. Some of them are either long to prepare or some of the ingredients are not available. Instead, I somehow mix and match them all together, and this is what I’ve came up with.

The dish has a soft cooked meat and very tasty. So far Me, My Husband and Pao2x, enjoyed the dish. According to my husband he liked it and he wants more. And that’s all I need to hear, that my family loves and enjoy the food I cook. Hehehe!

If you want to try my recipe then go ahead and I hope you like and enjoy this, the same way we did.

Ingredients:

  • 1/2 kilo Chicken (cut)
  • 3/4 cup Soy Sauce
  • 3/4 cup Granulated Sugar
  • 1 tsp. Grated Ginger
  • 1 tbsp. Garlic (minced)
  • 1 tbsp. Organic / Pure Vinegar
  • 2 tbsp. Pure Honey
  • 2 tsp. Cornstarch or as needed

Procedure:

  1. Whisk in a bowl the soy sauce, sugar, ginger, garlic, vinegar, and honey; until the sugar is dissolved.
  2. Pour half of the mixture unto the chicken. Then set aside for 15-30 minutes to marinate. Just leave the remaining sauce for a while.
  3. Preheat the oven to 170 celcius.
  4. Prepare a wide cooking dish or pan and put a foil or baking paper. Place the foil / baking paper basin like to avoid the sauce to spill. Make sure that the chicken don’t cover each other and are evenly placed.
  5. Bake the chicken for 60 minutes. Every 10-15 minutes turn the sides of the chicken for even cooking. For the last 20 mins, bake the top side to give a grill look. (Check it once in a while to avoid over cooking, resulting to a burnt chicken)
  6. Remove the chicken from the pan, leaving the sauce. Plate the chicken.
  7. Transfer the sauce into a sauce pan. In a low heat, combine the sauce that came from the oven and the mixture that is left behind. When the sauce is boiling, put in the cornstarch. Stir until the cornstarch is dissolved and the sauce it thickened.
  8. Pour the thickened sauce unto the plated chicken.
  9. You can also also garnish it with spring onions, as an added color.
Categories
Food

Old Fashion Onion Rings Recipe

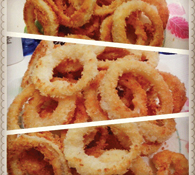
old-fashion-onion-rings-1Thanks to Mama Mel Jaranilla for the onions she gave us, I was inspired to look for a yummy onion rings recipe; as requested by my husband. Because of the satisfaction it has given to our family’s tummy and taste buds, I want to also share our experience.

Having this recipe is like having a pro made your onion rings!


Ingredients:

  • 1 whole White Onions (Large)
  • 2 cups All Purpose Flour
  • 1 cup Fresh Milk (I used Nestle Fresh Milk -Green)
  • 1 large Egg
  • 1 tsp Iodized Salt
  • Breadcrumbs (I usually use the one in orange packaging – the one used for tempura)
  • Vegetable Oil for frying
  • Extra salt for seasoning

Procedure:

  • Cut the onions in slices. Make sure to cut them in circles, then set aside.
  • Prepare 3 bowls. In one bowl, mix the flour and salt. In the next bowl, whisk the milk and egg together. And in the 3rd bowl, put in the breadcrumbs.
  • Dip and cover the onions one by one to each bowl of mixture, to this arrangement:
    • Flour Mixture
    • Milk and Egg Mixture
    • Then again at Flour Mixture
    • and Milk Egg Mixture
    • Breadcrumbs (slightly tap them to let it stick to the rings)
  • While preparing the rings, also prepare the oil in a pan and heat it. Make sure the oil is hot before you put in the onion rings.
  • When the onion rings are slightly brown/golden brown, take them out already. Then put them in plate with tissue paper to remove the excess oil from it.
  • Then season with salt

This is also best with a dip. The simplest dip you can have is mayo with garlic powder, mayo and ketchup or even just mayo.

Sounds yummy??? Try it now and give me a feedback on your experience. Hehehe… ENJOY!!!!!